Signing a file
If someone invites you to sign a file, you will receive an invitation email with a link to start the signing process.
You will also see the file in your eSigned files list.
To sign a file
-
Review the file and the privacy agreement.
-
Either
-
Open the invitation email.
-
Select the Review and sign button.
If you are not already signed in to File Sync & Share, you will be asked to do so.
or
-
Select the appropriate signing process (it will have a status of Your signature pending...).
-
Click Sign in the right sidebar.
-
-
Select Got it.
-
Review the file.
-
If you decide to sign the file, select Get started.
The agreement window opens.
-
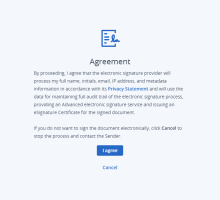
Read the privacy agreement and select I agree.
- Select Done.
-
-
Configure your eSignature

-
Enter your full name.
Your initials will be generated automatically, but you can change them if you need to. -
Choose between the system-generated eSignature or a handwritten eSignature.
You can edit the system-generated eSignature. -
Select a Signing reason. This will appear in your eSignature field.
Options are:
-
None (default)
If you leave this default, no reason will be included in your eSignature field. -
Approved by
-
Reviewed by
-
Issued by
-
Proxy signer
-
Prepared by
-
Witness
-
-
Select a Timestamp format.
A timestamp is included in your eSignature field. -
Read the legal text and select the I have read and agree checkbox.
-
Select Done.
-
-
Complete requested fields
There are two types of fields you can be asked to complete: required and optional. Completed field counters are located at the top of the window to help you keep track. When all required fields have been completed, the Confirm button is enabled.
If no optional fields have been requested, the Optional Fields Completed counter is not displayed.
-
Select Next field and enter the requested information.
Your name, your initials, and any additional signatures are populated automatically when you enter those fields. -
Repeat until all required fields are completed.
-
Select Confirm.
-
-
Verify ID
Already verified
 Check the information at the bottom of this window carefully. You need to be in possession of the phone indicated, and that the phone has coverage to receive an SMS.
If you have previously verified your ID on this system using this email, you will receive an SMS with a one-time password (OTP) from the Trust Service Providers, DigitalSign.
-
Enter the OTP and select Verify and sign.
-
Select Resend SMS if you have not received the SMS within a few minutes.
The verification screen is displayed with information about the file.

It can take a moment for your pending icon to change to the signed icon (
 ).
). -
Select Download file to download a copy of the eSigned file
 A file, stored in File Sync & Share, which has at least one complete or ongoing signing process. in its current state and with you as the latest signer.
 -
Close the browser tab.
You will also receive a verification email with the download link.First-time verification
To sign the file, you must verify your ID using our trust partner's mobile app, IDCheck
IDCheck is an ID verification app from DigitalSign. IDCheck is used by Advanced File Sync & Share as a Trust Service Provider (TSP) partner..You will need a smartphone with network coverage (to receive SMSs), an internet connection, and valid photo ID (your national ID card or passport).
-
Select Proceed.

-
Select your country code.
-
Enter your phone number.
Your phone number is required as part of the ID verification process.
You will receive an SMS OTP One-time Password.
An OTP is issued only once, and is often time-dependent. to start the ID verification process. Later, when your ID has been verified, you will receive another SMS.Subsequently, if you are invited to sign other files, you will not have to verify your ID again. Signature OTPs will be sent to this verified number. -
Select Next.

-
Enter the OTP you received by SMS.
If the SMS OTP does not arrive within a few minutes, select Resend SMS. -
Select Submit.

-
Take a note of the verification code. You will need it when you install the IDverification app.
-
Scan the appropriate QR code to download the ID verification app for your phone.
-
Follow the step-by-step instructions in the app.
When your ID has been verified, you will receive an SMS OTP One-time Password.
An OTP is issued only once, and is often time-dependent. from DigitalSign DigitalSign are a Trust Service Provider, certified by the European Union eIDAS regulator.
Acronis partners with DigitalSign for ID verification services.. -
Attach your verified digital eSignature
-
Select Proceed.
-
Enter the OTP and select Verify and sign.
-
Select Resend SMS if you have not received the SMS within a few minutes.
The verification screen is displayed with information about the file.
It can take a moment for your pending icon to change to the signed icon (
). -
Select Download file to download a copy of the eSigned file in its current state, with you as the latest signer.
-
Close the browser tab.
You will also receive a verification email with the download link. -
-


