Backing up partitions and disks

To back up partitions or disks, click Disk and partition backup on the Backup and recovery tab. This opens the Disk Backup window.

Disk backup

The steps below describe how to configure a backup using most of the available image backup settings.

  1. Select a partition to back up by selecting the corresponding check box. If you want to back up more than one partition, click Multiple partition selection. If the disk has several partitions and you want to back up the whole disk, click Switch to disk mode in the upper-right corner and then select the disk's check box. To return to the partition selection, click Switch to partition mode.
  2. Select a destination for backup (you can leave the default destination when it suits you or browse for a destination after clicking the down arrow to the right of the current destination and selecting Browse...).

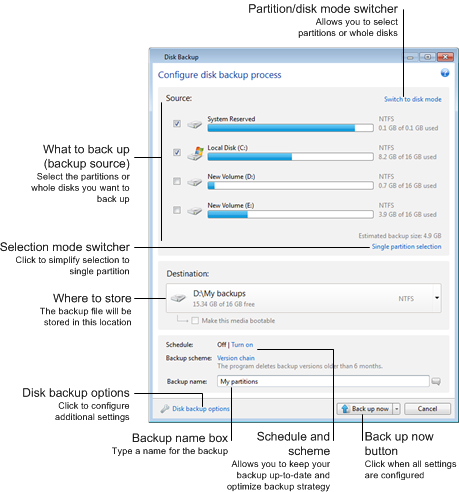
    When the backup destination is any removable media (USB stick, BD, DVD...), the Make this media bootable check box becomes selectable. Selecting the check box results in creating a bootable recovery environment on the removable media and adding a standalone Acronis True Image Home 2012 version. You will be able to run Acronis True Image Home 2012 from the removable media on a bare-metal system or the crashed computer that cannot boot.

    If possible, avoid storing your system partition backups on dynamic disks, because the system partition is recovered in the Linux environment. Linux and Windows work with dynamic disks differently. This may result in problems during recovery.

  3. If you need the backup to run on a schedule, click the link to the right of Schedule, turn on scheduling and set the required schedule. For more information see Scheduling.
  4. You can also change the default backup scheme by clicking on the appropriate link. For more information see Backup schemes.
  5. You can exclude hidden or system files and folders from backup, as well as files matching the criteria you specify. For more information see Excluding items from backup.
  6. If you would like to assign a specific name to the backup, type the name in the Backup name field instead of the default one.

    You can also add useful information to the backup name. To do so, click the down arrow to the right of the destination and click Browse.... Select the items you want to add in the right field of the File name line:

  7. Click Disk backup options to set the options for the backup being configured. For example, when your data disk contains sensitive information, you may want to protect the information by encryption. You can also choose to validate the backup immediately after its creation, though it can be done later. For more information see Backup options.
  8. When you set up the backup as needed, you can run it immediately by clicking the Back up now button. If you want to run the backup later or on a schedule, click the down arrow to the right of the Back up now button and select Later in the drop down list to save the settings you have made.