Your MacBook carries many important files - personal information, photos, music files, and essential documents. While an Apple device is generally considered safer than its competitors, Macs are also vulnerable to data compromise.
Accidental deletion, hardware failure, and cyberattacks can corrupt or delete data, often resulting in permanent data loss. To avoid such a scenario, creating regular, continuous backups of your MacBook is best.
This article will explore the different approaches to MacBook backup and solutions for protecting critical data from potential data-loss threats.
Why Do I Need to Backup My MacBook?
MacBooks provide reliable performance and built-in security features but aren't immune to data loss. Whether it's accidental deletion, hardware failure, software issues, natural disasters, or cyberattacks, Mac computers can be compromised, leading to altered, corrupted, or erased data.
Unless you implement the means to protect your information, data loss following a breach or compromise can be permanent. Instead, you can back up your Mac to ensure all essential information is securely stored away from your primary device.
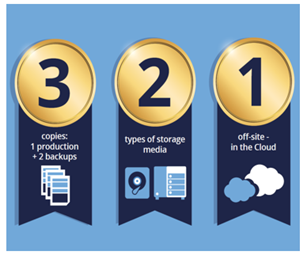
You can combine local Mac backups with cloud mac backup software to satisfy the 3-2-1 Rule of Backup. This ensures you'll always have at least one readily available backup copy to initiate recovery.
How to Backup Your MacBook to an External Storage Device?
You can back up your Mac to external storage using Time Machine, manual backup, or a third-party backup solution.
First, you need to connect the external drive to your MacBook. Let's see how to do so below.
Steps to Connect an External Storage Device to Mac computers
Plug in your preferred external storage device (USB drive, Thunderbolt drive, external hard disk) into the Mac.
You must use a storage device with at least twice your Mac's capacity to ensure regular backups.
If you use the external drive for Time Machine backup, you shouldn't store other files on it. You can format the external drive via Disk Utility to ensure backup compatibility. To do so, follow the steps below:
- Plug the external drive into your Mac -> open Applications -> Utilities -> open Disk Utility.
- Choose the designated backup disk and click Erase.
- Choose how to format the drive. Select ExFat if you want the drive to be able to access files on a Windows PC -> click Erase.If you don't need the backup disk to be compatible with Windows machines, you can format it to a Mac OS Extended type.
Set up the external storage device as your backup disk
For macOS Ventura or later, follow the steps below:
- Open System Settings from the Apple menu bar (in the corner of the screen).
- Click General (from the sidebar) -> click Time Machine (on the right).
- Select Add Backup Disk or click the Add button (+).
- Select the external drive and choose Set Up Disk.
- During the setup, your MacBook might prompt you to erase the storage drive so it can be used for a Time Machine backup. You can erase it or select a different volume or backup disk. Moreover, you might be prompted to choose whether to claim existing backups created on a different Mac (computer). If you want the existing backups to become part of this Mac's backups, claim them.
- After the configuration, your MacBook will continuously create backups and transfer them to the external disk.
Back up your Mac with Time Machine
To back up your Mac after the setup process, select Back Up Now from the Time Machine menu (it's in the menu bar). You can also wait for the feature to begin creating automatic backups.
From the same menu, you can stop or skip a backup and check its progress. The menu screen (at the top) will show how much of the current backup is created or the date and time of the most recent completed backup.
If you can't locate the backup process menu, you can check the Control Center settings (on macOS Ventura or later) or the Desktop & Menu Bar preferences (for macOS Monterey or earlier) to set them to show Time Machine on the menu bar.
Manual Backup Methods for External Backup Disk
You can also manually back up your Mac data to an external drive without employing Time Machine.
To do so, connect the external drive to your MacBook and manually copy and paste files into the backup disk.
Follow the steps below for a detailed walkthrough:
- Select Finder -> from the Finder window, select Preferences -> check your available hard drives under "Show these items on the desktop".
- Open your preferred external drive -> create a backup folder, and name it.
- From the Mac primary disk, select the Users' file folder -> select all the files you wish to back up -> drag them to the backup folder.
- Wait for the copying process to complete.
How to Create a Time Machine Backup?
Time Machine is a native macOS feature that automatically creates hourly backups for the past 24 hours.
It also creates daily backups for the past month and weekly backups for all previous months. When the backup disk is full, the oldest backups are deleted.
Set up Time Machine backup
You can customize the backup frequency (in macOS Ventura or later) via the following steps:
- From the Time Machine menu, select Open Time Machine Settings.
- Click Options -> choose an appropriate setting from the Backup frequency menu.
The initial backup may take longer than expected. However, you can use your MacBook during backup creation. After the first backup, Time Machine will only back up data that has changed since the previous backup, meaning future backups will be quicker.
Restoring data from Time Machine backups
Once you have created at least one viable Time Machine backup, you can recover single files or the entire backup to the same Mac or a different macOS computer.
You can use the Migration Assistant to transfer data from Time Machine backups to your MacBook. To do so, follow the steps below:
- First, if you need to reinstall your current macOS, do that before initiating recovery.
- Make sure that the Time Machine backup disk is properly connected to your MacBook. (and is turned on)
- Open the Migration Assistant on the Mac.The Migration Assistant can be accessed from the Utilities folder in the Applications folder. To open the Utilities folder, select Go -> Utilities from the Finder menu bar. You can also search for the Migration Assistant via Spotlight. If the Mac starts up with a setup assistant, proceed with the next step, as the setup assistant comprises a migration assistant.
- From the transfer options, select the option to transfer data from a Mac, Time Machine backup, or startup disk -> click Continue.
- Select the appropriate Time Machine backup disk -> click Continue.
- Select the backup you want to restore -> click Continue.
- Select which files or folders to transfer. Before clicking Continue, you must understand what transferring an entire user account means.Suppose you have a user account named "John Johnson" in the backup disk. If a user account on your MacBook has the same name, the Migration Assistant will ask you whether to rename or replace it.By choosing Rename, the Time Machine backup disk user accountwill be displayed as an additional user on your MacBook. (with its own login and home folder)By choosing Replace, the user account on your Time Machine drive will replace your MacBook's identically named user account.
- Keep in mind that extensive backup volumes will need hours to complete recovery. If you need to restore your Mac, it's advisable to do so in the evening and let the migration complete overnight. To start the process, click Continue.
- After the migration is complete, quit the Migration Assistant -> log in to the migrated user account on your MacBook to review its files.
Exploring iCloud Backup Options for Your MacBook
iCloud storage offers two primary features to manage and protect MacBook data. If you're using iCloud Drive, iCloud Photos, or Notes, your data will automatically sync to the cloud and be available across all your devices whenever you alter said data.
Any files on your MacBook that aren't regularly synced are stored in your iCloud Backup. When the Backup feature is turned on, iCloud will take periodic snapshots of unsynced data to ensure you can restore it any time you get a new Mac.
Enabling iCloud Backup on your MacBook
To ensure the availability of backup data and the best user experience, it's advisable to use the latest macOS version available for your MacBook. You must also ensure that your computer meets the minimum system requirements for iCloud. You can check them here.
Then, follow the steps below to configure iCloud backup for your Mac:
- From the Apple menu, select System Settings. Click Sign In with your Apple ID at the top of the sidebar.For macOS Catalina and earlier versions, select Apple menu -> System Preferences -> click Sign In. Enter your Apple ID and passcode; iCloud will automatically turn on when you sign in successfully.If you have already signed in to iCloud, your name will appear at the top of the window or side panel.
- Select Apple menu -> System Settings -> click your name (at the top of the sidebar) -> click iCloud.For macOS Catalina or earlier, select Apple menu -> System Preferences -> click Apple ID -> choose iCloud from the sidebar.
- Choose which apps - Photos, Notes, iCloud Drive - to use with iCloud. If you can't locate an app, click Show All or Show More Apps, or scroll down until you find all the options you need.
- Click Sync This Mac (or Turn on).
Backup Your MacBook with Acronis Personal Cloud
Acronis Cyber Protect Home Office unifies reliable backup and anti-malware in a comprehensive cyber protection solution. The solution is easy-to-pilot and protects all your files, systems, devices, and identity information while ensuring continuous backups to a dedicated cloud.
ACPHO can detect unknown malware via AI- and ML-powered techniques and stop all threats to your data, including cyberattacks, disk failure, device theft, and accidental deletion.
Moreover, even if a ransomware attack compromises your device, Acronis Cyber Protect Home Office can automatically recover any affected data following a ransomware breach.
Whether you want to protect a few files or your entire Mac, the software offers flexible backup and recovery options so that you can customize the process to your specific needs and preferences.
Setting up Acronis Cyber Protect Home Office for MacBook backups
Below, we will review the steps to set up ACPHO to create regular, continuous MacBook backups to the Acronis Cloud.
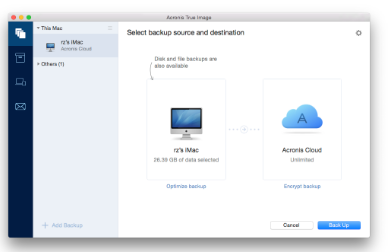
- Launch Acronis Cyber Protect Home Office.
- If you already have created a backup via ACPHO and want to create a new one, select the plus sign (at the bottom of the backup list).If this is your first time performing a backup via Acronis Cyber Protect Home Office, skip this step.
- Click the backup source icon -> select what data you want to back up:Entire Mac backup will back up all internal hard drives in disk mode. The backup will comprise the operating system, installed apps and programs, system settings, and personal data, including photo and video files, music, and documents.DisksFiles and foldersMobile Devices - you can find detailed information regarding mobile device backups here. Cloud service (used to back up M365 data)Files to notarizeNAS device (if available)
- Entire Mac backup will back up all internal hard drives in disk mode. The backup will comprise the operating system, installed apps and programs, system settings, and personal data, including photo and video files, music, and documents.
- Disks
- Files and folders
- Mobile Devices - you can find detailed information regarding mobile device backups here.
- Cloud service (used to back up M365 data)
- Files to notarize
- NAS device (if available)
- From the backup destination icon, select Acronis Cloud -> click OK. (if you haven't signed in yet, do so by entering the email address and password for your Acronis account and clicking Sign In)If you don't have an Acronis account, you must create one: Create Account -> type your email address and password -> click Create Account.
- You can configure additional backup settings, such as optimization, exclusions, scheduling, retention, and encryption. This is an optional step, and you can explore it further here. If you don't want to configure additional backup settings, proceed with the next step.
- After configuration, click Back Up to initiate the backup process.
The first cloud backup created via ACPHO may take a while to complete. Future backups will likely be much quicker, as they only transfer changed data to the cloud.
Benefits of using third-party cloud services for MacBook backup
Below, we will quickly review the primary benefits of using a dedicated cloud backup solution for regular Mac backup.
- Cloud backups are accessible from anywhere, anytime, as long as you have a stable internet connection. This is especially beneficial for disaster recovery to minimize downtime.
- Automated backups can save you time, effort, and costs. Configuring the cloud backup tool to your specific preferences will create continuous backups without human supervision.
- The cloud offers unlimited scalability. Unlike physical backup infrastructure, you can scale cloud storage up or down depending on your current data backup needs.
- Dedicated cloud backup solutions ensure enhanced macbook data security for data at rest and in transit. EDR, end-to-end encryption, and backup integrity verification are just a few of the features that safeguard data regardless of location.
- Cloud backup services offer flexible, pay-as-you-go (or subscription) models, meaning you can customize your costs depending on your current budget and needs.
Recovering Backed Up Data from Secure Storage Space: Methods and Techniques
Now, let's explore how to restore your Mac from a backup via Time Machine, external disk, and Acronis Fast Recovery.
How to recover Time Machine backups
- Connect your Time Machine backup disk to the MacBook.
- Click the Apple logo (in the top-left screen corner) -> click System Preferences.
- Click the Time Machine icon to open the Time Machine preferences.
- Check the box for the "Show Time Machine in menu bar" option.
- Click the Time Machine icon from the menu bar -> select Enter Time Machine to see all available Time Machine backups.
- Browse the backups to locate the files and folders you wish to recover.
- When you find the data you want to recover, click Restore. This will restore and copy the data to its original location on your MacBook.
How to retrieve data from external hard drive backups
If you have manually created data backups to an external drive - via copy and paste or drag-and-drop - you can connect the external disk to your MacBook, open it, and start browsing files. Once you locate the data you need to restore, copy it to the Mac computer.
How to restore a Mac backup via Acronis Cyber Protect Home Office
To recover data via ACPHO from an external drive, follow the steps below:
- On the left pane in the backup agent, select the backup containing the files and folders you want to recover -> open the Recovery tab.
- Select the backup version you wish to restore from the Backup list. (following the data recovery process, the files will be restored to the state they were on the corresponding date)
- Select which files or folders you wish to recover.
- Click Recover. When the process is complete, your Mac data will be restored to the selected date and time version and stored in its original location.
Follow the guide here to configure a custom location for the recovered files and explore advanced recovery options.
To recover data via ACPHO from the Acronis Cloud, follow the steps below:
- On the Mac where ACPHO is installed, open Acronis Cyber Protect Home Office -> select Account from the left menu pane.
- In the Acronis Cyber Protect Home Office section, select Browse my data.
- Go to https://www.acronis.com/my/online-backup/webrestore/ from your web browser -> log in to your Acronis account.
- On the Backups tab, select the required backup name -> browse the backup to locate the files or folders you need to recover. (you can also use the Search option to find the data by name)
- Select which files or folders to restore with a check mark.
- Click Download to start the recovery process. The selected files and folders will be downloaded to the default downloads folder.
If you want to download a specific file version, click Versions (on the right sidebar) -> select the corresponding date and time of the specific backup -> click the download icon on this line.
Conclusion
Backing up your MacBook is critical to protect personal information and essential data. Regular, reliable backups minimize the risk of data loss and ensure your files are readily available for recovery whenever needed.
You can back up your Mac to local backup or leverage cloud storage to satisfy the 3-2-1 Rule of Backup. Employing Time Machine with external drives and a dedicated cloud backup solution ensures your data is stored securely in multiple locations.
All the files from your MacBook's drives can be securely transferred to a dedicated cloud via wireless backups. By backing up all your data via online backups, you can guarantee its integrity and availability, even if your primary MacBook is compromised or stolen.
Said backups can be automated, thus saving you time, effort, and costs while fortifying your data against accidental deletion, cyberattacks, and hardware failure.
Implementing a sensible backup plan may seem challenging, but it's worthwhile. A reliable backup strategy often makes the difference between seamless data recovery and permanent data loss.
Partnering with a robust cloud backup solution, such as Acronis Cyber Protect Home Office, can ensure that all Apple devices on your network, including all the data on your Mac, are always protected, regardless of the data loss scenario.
If that sounds like something you'd want, give it a try. Your data will appreciate it.
Backup Your Mac And Secure Your Data Today!
About Acronis
A Swiss company founded in Singapore in 2003, Acronis has 15 offices worldwide and employees in 50+ countries. Acronis Cyber Protect Cloud is available in 26 languages in 150 countries and is used by over 20,000 service providers to protect over 750,000 businesses.